Friday, April 1, 2011

Battle Report: Rhyas vs. Bloody Barnabas

In spite of my goal to only play Saeryn and Thagrosh between now and the upcoming tournament, I've found myself playing a few games with Rhyas lately, and thought I'd post one up here. She's my worst Warlock by far, since with low fury and not much synergy with a lot of the models I normally take I'm having a hard time getting effective use out of her. Since my old strategies haven't worked, I decided to try something new:

Rhyas, Sigil of Everblight
-Scythean
-Seraph
-Shredder
-Shredder
-Shredder
Striders
The Forsaken

I normally bring my Carnivean since I want to use the throw something at the enemy caster/teleport next to the knocked down caster for the kill combo, but I've found either the caster is too far back or the Carnivean can't get in walking range. I decided to swap him out for a Seraph, which also helps me save on points since we're playing 25 instead of 35. I also replaced the Nephilim Soldier I usually bring with more Shredders, since I haven't gotten much use out of the Nephilim's animus while the Shredders are pretty powerful on Rhyas' feat turn. The last change was dropping the Strider UA - its mainly to make the points, and against Blindwater I don't expect I'll be able to get much shooting.

My opponent had the following:

Bloody Barnabas
-Blackhide Wrastler
-Ironback Spitter
-Bull Snapper
-Bull Snapper
Gatormen Posse
Croak Hunter

The last time I played against gators, the only beast they had was the Wrastler, so it'll be interesting to see how the Spitter and Snappers play. I win the starting roll and opt to go first.

Terrain
We decide to play a scenario, so we take turns placing pieces of terrain until we're satisfied. I go for two forests, putting them in the middle since it gives me a huge advantage. My opponent puts up a wall and obstruction on his side, then drops the two shallow water templates he gets as a Minion contract bonus in the middle. We end up with a setup like this:
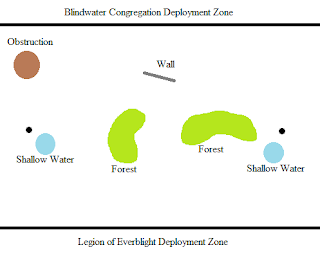

We roll for scenario and get Throw Down - there are two objectives, one on each side of the board. At the end of a turn, if a warrior model is within 8" of an objective with no enemy models within 8", its owner gets a control point. 2 control points are required to win. The objectives are the black circles in the middle of the map. This is going to be rough, since all I have that can take control points are Rhyas, the Striders, and the Forsaken. Luckily my opponent is in a similar boat, so we'll both be looking for the assassination.

Legion Deployment
Wanting to take advantage of the forests, I deploy my forces on the right side, with the Seraph and Carnivean up front, flanked by the Shredders, and Rhyas and the Forsaken behind them.

Blindwater Deployment
My opponent deploys Barnabas and the beasts in the middle, with the Wrastler and Spitter up front and Barnabas and the Snappers behind them. The Gatormen go on the far left, looking to take the left objective.

Legion Advance Deployment
I put my Striders as far up as I can on the left, hoping I can shoot down enough of the Gatormen to take the control point for myself.

Blindwater Advance Deployment
The Croak Hunter deploys on the far right, hoping to take some pot shots at my beasts before the fighting starts.

Though the army's approach would have been silent to most ears, in the quiet of the swamp they may as well have been a herd of elephants to Barnabas' trained ears. His prey was strange smelling, almost unnatural. What passed for a slow grin crossed the aged Warlock's toothy maw. Perhaps this new food would finally be able to help him achieve his apotheosis.

Legion Turn 1
Rhyas gives one of the Shredders Occultation, puts Rapport on the Seraph, then uses Slipstream to move up, pulling the Seraph with her. The Seraph also uses Slipstream before moving up, pulling the Scythean forward. It tries to shoot the Croak Hunter but is well out of range. The Occulted Shredder goes Rabid and runs into the right forest, hoping to get in range to snack on the Croak before it can hurt anyone. The Scythean runs up as well, getting just a little bit into the forest. One of the other Shredders runs up, putting itself a bit behind the shallow water on the right, while the last Shredder just walks forward. The Forsaken runs up next to Rhyas, and the Striders run forward, getting near the objective and hoping to keep the Gatormen off it.

Blindwater Turn 1
The heavies both run forward, as does the Snapper on the right. The Snapper on the left moves towards the Gatormen and gives out of them Spiny Growth. They all run forward, putting themselves in a line so only the on with Spiny Growth can be hit with a CRA. Barnabas then moves up and puts a Swamp Pit near the Croak Hunter before giving himself Iron Flesh. The Croak Hunter moves into the swamp pit and takes a shot at the Shredder in the forest. He's just close enough to ignore Occultation, and takes about half the Shredder's health.

Rhyas whispered a soft curse as she felt her forward Shredder growl in pain. This mission kept getting more and more annoying - first the city Everblight tasked her to recover the relics from had sunk into the swamp in the eons he had been gone, and now her small scouting party was under attack. She hoped the Strider team sent to recover the other relic had managed to avoid the conflict, but over the silent swamp she her the distinct sound of bowstrings and arrows sinking into flesh. She willed her beasts forward - if the enemy would not submit, she would bring them to heel with the edge of her blade.

Legion Turn 2
I'm wounded, but feeling pretty good - the forest is providing me with some excellent cover. Rhyas activates first, dropping Occultation but keeping Rapport. She moves up and spends a point to heal the wounded Shredder for 1, then gives herself Tenacity, just in case. The newly healed Shredder then goes Rabid and moves up to the Croak Hunter, and takes him down with one bite. Mmm, tasty, tasty frog legs! The Seraph moves up and takes a shot at the Snapper in range, though it only gets 2 shots with Strafe. Even though I boost to hit on both rolls, the second one misses, so the Snapper survives. The Forsaken and other Shredder both move up, and the Scythean stays put - he's really liking the cover of the forest. On the opposite side of the board, my Striders move up and do a 6-man CRA on the lead Gatorman, who lives by 2 points. Ahhh, if only he didn't have Spiny Growth, or if I had taken the UA, he would be dead!

Blindwater Turn 2
Deciding its time for some action, my opponent upkeeps Iron Flesh and moves Barnabas up to the edge of the forest and uses his feat, knocking down Rhyas, the Forsaken, the Shredders and the Scythean (thankfully the Seraph can't be knocked down). Unfortunately for him, most of my models are safe thanks to the forest. He heals the Snapper and charges the wounded Shredder, finishing the beast off. His heavies move foward, trying to give Barnabas some protection. On the other side of the board, things don't go so well, as the Gatormen again get Spiny Growth before charging into the Striders. I positioned them too close, and 5 of the 6 are caught in melee range. Thankfully most are only caught by reach and 3 survive the turn, even passing their leadership checks for terror.

Barnabas willed his beasts to close on their prey, his old blood quickening as he felt the aura of another Warlock nearby. The croaking death of the anura scout he sent forward pushed him over the edge into bloodthirsty ecstasy, and he charged forward, unleashing the power of the swamp to bring his enemies to their knees. His beasts followed suit, entering the damp forest where their enemy hid.

Legion Turn 3
While the left side is almost lost, I've got a pretty good assassination attempt and decide to go for it. Rhyas and the beasts all spend fury to stand up, and the Seraph activates first, standing and taking a shot at Barnabas. I roll 3 attacks total, and by boosting hit and damage rolls on the first 2, I take out about half his health. Unfortunately the third shot misses, still not bad for just one beast! Rhyas keeps the last 2 fury for herself, just in case this fails. The Scythean then walks up and takes a chunk out of the Wrastler, teleporting behind him and into melee range of Barnabas. He uses the second swing on the Wrastler as well, dropping it to half health and triggering Bloodbath. The swing on the Wrastler leaves only his mind intact, and I boost the hit on Barnabas, bringing him down to 6 HP. I then take two more swings at him with boosted attack rolls thanks to the extra attack from the feat, and he's forced to transfer both away, killing one Snapper and seriously injuring the other. He's out of fury now, so I have one of the Shredders go Rabid and walk up to the Wrastler, doing a modest 4 points to him before teleporting behind and biting Barnabas with his feat attack. I hit and manage to get enough damage to kill, but he makes his tough roll! There isn't any more space left, so I have my last Shredder go Rabid and finish off the Wrastler. The forsaken takes the fury off the Seraph so I have a transfer target just in case, and on the left side my Striders try to disengage and finish off the wounded Gator. Unfortunately he makes both his free strikes, leaving me with just 1 Strider, who fails to hurt the ARM 18 monstrosity.

Blindwater Turn 3
My opponent is reeling, desperately tries to salvage the situation. The Spitter moves up and takes swings at the Shredders, killing 1 and seriously wounding another. Barnabas then activates, and while he kills the other  Shredder, the Scythean still has half its health left. The remaining Snapper runs back towards the right side, but is unable to get in range. On the left, the Gatormen finish off the Strider and score a control point. Despite how well things are going for me, I'm actually close to losing - they'll score another control point at the end of my turn, giving them enough to win. My only hope is to finish off Barnabas now!

Rhyas pulled herself to her feet, surprised she had not noticed the presence of a Warlock in the enemy company until he unleashed a tidal wave on her forces. Though she could not see him, her beasts were well aware of his presence thanks to their heightened senses, and she focused her mind to give them a portion of her speed and skill. They used the powers effectively, tearing apart the large gator-beast protecting its master before unleashing their fury on the Warlock himself. Before they could finish him, her focus was pulled away by the dying screams of the Striders, signaling that they had failed to recover their objective.

Legion Turn 4
Fortunately its not hard. Rhyas heals the Scythean, who gives himself Bloodbath so I don't fail due to tough, and boosting the attack roll lets me finish off the Gatorman Warlock.

Barnabas awoke to find a group of gatormen carrying his battered body through the swamp, entering deeper water that their enemies would not be able to traverse. The shaman informed him that their enemy had been trying to recover some kind of artifact, and they had taken it before eating the leader. For the second time that day, a smile crossed Barnabas' face. The Worthy Prey would be back for their trinket, and when they were, he would be ready.

Aftermath
For 25 points, that was a pretty brutal game! I had a huge edge thanks to the giant forests in the middle, which kept my opponent from taking advantage of his feat and essentially kept me safe until I engaged. It was still a close match though, as if my opponent survived 1 turn longer he would have won on scenario. For the last turn, I probably would have had Barnabas kill both Shredders rather than targetting the Scythean, then had the Spitter throw the Scythean away. If he positioned it right, it would be pretty tough for me to get to Barnabas, especially if he put up a swamp pit to keep the Seraph from shooting him. It just goes to show - if you're losing badly, don't freak out and forget about the scenario, since that might be your best shot at winning!

Sunday, March 27, 2011

Battle Report: Epic Thagrosh vs. Epic Stryker

Hey guys, time for another battle report. This one was between two faction commanders - Epic Thagrosh and Epic Stryker. My opponent started playing a few months before I did, and is getting good enough that some of the local tournament players are starting to take notice. I'm nervious since he's crushed me mercilessly in the past, but this time I've got the Messiah on my side:

Epic Thagrosh
-Carnivean
-Scythean
-4 Shredders
Striders + UA
Spell Martyr

With half my Shredders being stripped, I couldn't run my standard Shredder-heavy list, so I decided to try running two heavies and see how Epic Thagrosh does.

The Cygnar force looked like this:

Epic Stryker
-Ol' Rowdy
-Lancer
Stormblades + UA
-3 Storm Gunners
Black 13th
Journeyman Warcaster
Victor Pendrake
Rhupert Carvolo
Squire

Wow, thats a lot of solos! Also, my hated enemies - the Black 13th. Stupid 3-man character units and their incredible power. My opponent wins the roll and goes first.

The map was a bit crazy - there was a giant hill over most of it, as well as a river that we decided to play as a gorge  - difficult terrain, and costs 1" to climb out. Here's a picture in my favorite art software, Paint:


Deployment
The Stormblades deploy in center, with Stryker, Ol' Rowdy, the Squire, and Rhupert behind them. The Journeyman deploys to their right, and the Lancer is placed on the far right side of the hill. The Black 13th and Pendrake deploy on the left.

I form a line of 2 Shredders, Carnivean, Scythean, 2 Shredders on the left side, and put Thagrosh and the Spell Martyr behind them. The Striders advance deploy in 2 lines of 4 on the right side - I want them as far away from the Black 13th as possible. The Stormblades use their advance move to walk straight up.

Cygnar Turn 1
The Journeyman gives the Stormblades Arcane Shield, and the Piper grants them March, allowing them to run up to the edge of the gorge, with their supporters close behind. The Black 13th and Pendrake also run straight forward, as does the Lancer on the opposite side of the giant hill. Stryker moves left towards the B13 and casts Deflection, boosting the Stormblades to an incredible ARM 20 vs range! Gotta figure out a plan to deal with them or he can use them to walk right through my army. Stryker then puts up a Lightning Storm to block line of sight to him, and Ol' Rowdy and the Squire run up after him, the jack moving in front to keep me from trying an early assassination.

Legion Turn 1
The Striders move forward, and try a 3-man CRA on one Stormblade, but I forgot about Deflection and need an 8 to kill him, which doesn't happen. The other 5 Striders combine and manage to take one Stormblade out - first blood! They then scatter, hoping that anyone who comes after them will engage only the few in front. The beasts all run forward, and Thagrosh follows behind, giving the Carnivean, Scythean and himself Spiny Growth. The Spell Martyr runs up behind the Scythean, trying to keep out of sight.

Cygnar Turn 2
Stormblades get March and assault, and while a few go for the Striders, half the unit takes aim at the Carnivean. Despite the +2 ARM from Spiny Growth, he takes 12 points of damage, though thankfully its spread out so no aspects are lost. One of my Shredders also takes 2 shots, losing his mind and body aspects. 3 of the Striders die to shots and Combined Melee Attacks. Stryker and Rowdy move forward into the ditch, Stryker once again putting up Deflection and Lightning Storm, then using his feat. The Black 13th move forward, with Ryan moving into the gorge, but my opponent forgets about Stealth on the Striders she misses her first attack. Watts is able to take one down thanks to mage sight, but the remaining attack all fall short of other targets. The Squire runs up behind Stryker, and the Lancer runs forward into the gorge.

Stryker's feat then triggers, and hell breaks loose. The Stromblades move up, engaging the Striders and killing 2 with CMAs. Thankfully the unit passes its command check. One moves to the left behind the wall, and I discover why when Stryker and Rowdy move up out of the gorge, and the Stormblade is now right in the path of Rowdy. The rest of his army just moves up.

Legion Turn 2
I'm hurting badly, but there's a glimmer of hope - with Stryker on this side of the gorge, I can try to use my feat to take him out. Thagrosh activates first, using Manifest Destiny and his feat and healing the wounded Shredder. I then slide right - if this assasination fails, I don't want to be anywhere NEAR Stryker. The wounded Shredder then goes Rabid and charges the Stormblade guarding Rowdy, but the jack countercharges and squishes my beast. I then try to move the other Shredder on the left up to finish the Stormblade, but I'm just short and can't get close enough because of the wall. One of the Shredders on the right goes Rabid and moves up to take down a pair of the Stormblades that ganged up to kill a Strider, and the Scythean charges Ol' Rowdy. With a flurry of attacks and Bloodbath, it takes down both the jack and the Stormblade, opening the path to Stryker. The Carnivean moves up and sprays at the Warcaster, doing a few points of damage, and the last Shredder goes Rabid and runs, getting into range for the feat. The Spell Martyr retreats, trying to get in the way of anything going after Thagrosh. The unengaged Striders pull back and shoot down another Stormblade, while the lone Strider still engaged gets lucky and takes another one down with his sword, forcing a command check, which sadly they pass. They all reform into melee with the Stormblades, hoping to keep them tied down and away from Thagrosh.

My feat triggers, and now its time for some vengeance! The two Shredders closest to Stryker move up and bring him down to 6 health! Unfortunately, my heavies don't do as well - the Scythean misses, and the Carnivean can't get into range. I make a mistake here - I didn't realize Stryker had reach, and while the Carnivean can't get to him, he can get to the Carnivean! The last Shredder moves back to protect Thagrosh, since there's no way I'm going to get into melee with Stryker.

Cygnar Turn 3
My opponent is reeling - in one turn he lost half his Stormblades and Ol' Rowdy, and Stryker is surrounded. He activates Pendrake first, giving the Black 13th Beast Lore. The gunmage team then use the boost to kill one of the Shredders attacking Stryker, as well as the Spell Martyr, leaving just the Shredder protecting Thagrosh. The Journeyman and Lancer move up and try to remove the Striders, but DEF 15 keeps me safe. With just the Stormblades left to hit Thagrosh, my opponent activates Stryker to try to remove my transfer targets. He only uses 1 die, rolling 5 for POW and 3 for damage, leaving him at 3 hp! He then burns through his fury to kill both the Carnivean and Scythean, but rolls snake eyes with his last attack on the Shredder! Thagrosh is now sitting on full fury thanks to all the beasts that died this turn. The Stormblades try to go for broke, and the ones that can assault Thagrosh and the Shredder guarding him. The Strider fail their free strikes, and the Shredder bites the dust. Thagrosh himself even takes 6 damage, and spawns another Shredder. The remaining Stormblades use their activation to finish off the Striders.

Legion Turn 3
I'm down to 2 Shredders and Thagrosh, but I just need to put 3 points of damage on Stryker! The Shredder still engaged with him frenzies, but misses his attack. Thagrosh then moves out of melee with the one Stormblade engaging him, transferring the free strike damage to the Shredder that frenzied. He sprays his breath at Stryker, boosting to hit and scoring a critical! With Stryker frozen, the game is all but over, and boosting the damage I take him out without even activating the other model left in my army.

Aftermath
My opponent predicted it would be a bloody game, and it certainly was! While I was really concerned about the Stormblades at the time, I realize now that they formed the bulk of my opponent's force - without them all he really had was support pieces. While the heavy warbeasts were certainly powerful, they didn't get as much from Thagrosh's feat as Shredders, mainly since even under Manifest Destiny, they still struggle to hit DEF 16 that most Warcasters have without the boost. Overall, this was one of the closest games I've ever played!

Thursday, March 24, 2011

Battle Report: Saeryn vs. Zerkova

Hey guys, time for another Battle Report. Since I'm prepping for the tournament next month, I'm trying to play my Thagrosh and Saeryn lists as much as possible, and with half my Shredders being stripped down, I went with Saeryn:

Saeryn
-Carnivean
-Scythean
-Shredder
-Shredder
Striders + UA
Blackfrost Shard
2 Spell Martyrs

My opponent is a new player at our store, and he was bringing, of course, Khador. It seems like no matter which store I go to, over half the players are playing Khador! He was bringing Zerkova, someone who I'm pretty familiar with since Del from the Brush/Paint/Mini blog plays her almost exclusively:

Zerkova
-Destroyer
-Decimator
-Spriggan
Widowmakers
Great Bears
Kell Bailoch
Manhunter

A solid list, with several jacks as well as some shooting and melee backup. With my experience against Khador, I'm not that worried. Interestingly, we're both using our factions' 3-man character units. Between these guys and the Black 13th, it seems like thats a pretty popular option! I win the roll and opt to go first. Below is a picture of the map:

Legion Deployment
Wanting to take advantage of the forest, I use my typical block formation just right of the middle: a front row of Shredder-Carnivean-Scythean-Shredder, with Saeryn and the Spell Martyrs behind them. The Blackfrost Shard sets up to the far right, hoping to flank my opponent.

Khador Deployment
The Great Bears deploy directly behind the forest, with Zerkova right behind them. The Spiggan and Destoryer deploy to the far right, across from the Blackfrost Shard, and the Decimator deploys on the right side of the forest. The Manhunter deploys to the left of the forest as far up as possible, so the Decimator is behind him.

Legion Advance Deploy
Since I'm going first and don't have to worry about getting shot to pieces, I deploy my Striders in 2 tight rows of 4 as far up as possible, right in front of the forest.

Khador Advance Deploy
The Widowmakers and Kell deploy in the back edge of the forest, to take advantage of Camoflage and Prowl.

Koldun Kommander Aleksandra Zerkova gazed out into the chilly night. Though her scouts reported nothing, her Orgoth artifacts had alerted her to a powerful arcane presence several days ago. While she had hoped to avoid the conflict, her foe had proved tenacious, drawing closer each night. Finding a defensible position, she ordered the Warjacks unloaded and fueled as she sent her advance forces, accompanied by the hired gun Bailoch, to give the intruder a bloody welcome. Whoever had the gall to interrupt her work was about the pay dearly.

Legion Turn 1
I suspect my opponent deployed his Widowmakers too close, so I walk my Striders up and attempt 4 2-man CRAs, one on each. Fortunately all are in range, and thanks to hunter, 3 Widowmakers bite the dust. The last passes his command check - I guess having the master hunter Kell Bailoch next to him inspires confidence, even when the rest of his unit is dead! The Striders then scatter with their reform move, wary of the Destroyer's cannon. The Shredders and Scythean run up, while the Carnivean just advances so he can put Spiny Growth on himself. Saeryn follow behind and puts Spiny Growth on the Scythean, as well as Respawn on the Carnivean. I decide to take the risk and have the Blackfrost Shard run up, instead of getting stealth. Just in case, I have Sevryn, the leader, move up in front, since he is the least valuable.

Khador Turn 1
My opponent is out for revenge after the loss of the Widowmakers, so the Spriggan advances up and puts a flare on one of the Striders before shooting his grenade cannon at him. Thankfully he misses, and the deviation doesn't catch anyone. Unfortunately the Strider's luck runs out quickly as the last Widowmaker advances and kills him with a Sniper shot. Kell also moves up and finds himself just within 5" of one of the Striders, who he also takes out with a Sniper shot. The Destroyer moves up next to the Spriggan, and takes a shot at Sevryn, who is just within range. Boosting to hit, he turns the Blackfrost Shard's leader into a hole in the ground. The Great Bears run around the left side of the forest, and the Manhunter advances and moves right, hoping his stealth will protect him from the Striders. The Decimator then runs forward, prodiving a nice deterrent so my Carnivean doesn't get any ideas of catching the Manhunter with his breath. Zerkova moves up, and using her Ghost Stone and Lens of Tarvodh takes out another Strider with Razor Wind.

A grim smile crossed the Omen of Everblight's face. Though her Striders had slaughtered the opponent's scouts nearly to a man, the alarm had still been sounded. At least some of the failures had been taken care of by the return fire. Her hopes of quietly capturing the Khadoran sorceress quickly faded as she saw the plumes of smoke in the fading light, telltale signs of Warjacks. A massive blast shook the earth, and she spared a quick glance in the direction of Sevryn and his brothers. Though by no means irreplaceable, their skills were still quite valuable and she hoped none had been seriously injured.

Legion Turn 2
My opponent is closing in, but I'm wary of Zerkova's feat - I don't want to get caught with 6-7" between us so I can't get to him but he can charge me. I advance the Striders up and finish off Kell with a CRA, but the last Widowmaker manages to survive. I then reform one of the Striders into melee with the Widowmaker, and another into the Decimator. The Manhunter looks to be trouble, so I have Shredder go rabid and run close to him, then follow up with a Spell Martyr. Saeryn activates, moving up and arcing Blightbringer through the Spell Martyr onto the Manhunter. One boosted damage roll later, he's nothing but a bubble in the pool of acid. The Carnivean then charges the Strider leader, allowing me to line up a breath attack on the Decimator as well as have the Strider there to keep me safe from charges. After all, DEF 15 should be safe from MAT 6 and RAT 4. I roll for the breath attack on the Strider, and get boxcars, killing him instantly. To add insult to injury, despite boosting the attack roll on the Decimator, I still miss. Well, that backfired miserably! The only upside is the Carnivean can put Spiny Growth on himself. The Scythean moves forward and right, positioning himself to take care of the Spriggan and Destroyer, and the remaining Spell Martyr runs up in front of him so he won't be charged. The second Shredder moves up to the edge of the forest, preparing to assist where needed, and the remaining members of the Blackfrost Shard move up, this time getting Stealth so they won't suffer the same fate as their leader.

Khador Turn 2
With our armies about to engage, my opponent decides its feat turn. He gives 3 focus to the Spriggan and 2 to the Decimator, then moves up to just behind the forest and uses the final two along with Ghost Sight and the Lens of Tarvodh to take out my Spell Martyr. She then uses her feat. With the path to my Carnivean clear, two of the Great Bears try to charge him, but find themselves short. The third goes after my Shredder, who he kills depite taking a point of damage from Blightbringer. The Decimator tries to trample past the Strider engaging him and manages to catch another one, but only the first dies thanks to a boosted attack roll. This leaves the second Strider and the Decimator in an odd position - they're in base to base, but since they're back to back, they aren't engaged! On the right side, the Spriggan tries to charge the Scythean, but falls short, so the Destroyer moves up and tries to take a shot at the Blackfrost Shard, but it misses and scatters into the middle of nowhere. The Widowmaker takes a swing at the Strider he's engaged with, but unsurprisingly misses.

Zerkova grimaced as she took in the battlefield. Somehow the enemy's forces seemed to melt into the growing shadows, appearing out of nowhere to kill the Manhunter who had been guiding her but nowhere to be found when her forces charged in after them, even escaping the so-called "Great" Bears of Gallowswood. Hoping to turn the tide, she called focused her energy and brought forth a howling winter gale, hoping to disorient the enemy long enough to land a crushing blow.

Legion Turn 3
He's used his feat and I'll still be able to engage him in melee, so its time for my counter attack. The Carnivean walks up between the Great Bears that charged at him and the Decimator, but is only able to get into melee with the Jack. A flurry of attacks later and the only uncrippled system he has is a few boxes on his gun arm. Saeryn then moves up and casts Blightbringer on the Carnivean, which fails to damage the Decimator but kills the closest Great Bear. She then slides a bit to the right and uses her feat. The two unengaged Striders each take a shot at one of the Great Bears, and great hit and damage rolls take down both, but one makes his tough roll, and isn't even knocked down to boot! The last Strider flails in vain at the Widowmaker, but the Scythean then moves up and, with help from the Blackfrost Shard, drops the Spriggan to 6 health, sadly with both his arms still active. The Shredder pulls back to Saeryn, since I feel like I've got the game in the bag but don't want to mess it up at the end.

Khador Turn 3
His forces are in shambles, and to make matters worse he can't retaliate against the beasts that are tearing him apart. The Decimator turns around and takes a swing at the Strider right behind him, but misses with his damaged arm. The Spriggan bulldozes the Scythean, but thanks to reach we're still engaged. The Destroyer takes a shot at the Scythean, but misses and ends up hitting the Spriggan instead, taking out his shield arm! Ironically, thanks to bulldoze, the Scythean is out of range. The last member of the Great Bears charges the Strider fighting the Widowmaker and kills him, and the newly free Widowmaker takes a shot at Saeryn, but misses. Zerkova finally decides to move around the forest and takes a boosted Razor Wind shot at Saeryn, but rolls 3 1's!

Despite the fact that her beasts were tearing apart the enemy jacks, Saeryn's smile had faded. They had taken down most of the opposing force, but the witch was yet to be found. Though she was tempted to send her beasts out to scour the enemy camp, she restrained herself and kept them focused on the task at hand. The enemy Warcaster's time would come soon enough...

Legion Turn 4
I ran a bit hot on Fury last turn, so I'm not able to take everything off my Carnivean. He rolls 2 6's on the Frenzy check, but the fully boosted bite attack is all thats needed to scrap the Decimator. The Shredder runs rabid and brings down the Spriggan, freeing up the Scythean to walk up and scrap the Destroyer. Saeryn herself then moves up, and with a pair of fully boosted Deathspurs takes out the last Widowmaker and Great Bear.

Khador Turn 4
With nothing but his caster against my whole army, my opponent runs Zerkova off the back edge of the board and concedes.

Kommander Zerkova silently cursed the incompetent forces assigned to her as she trudged through the light snow. Though she had escaped the battle, her research would be set back by months as she requisitioned enough resources to attempt this expedition again. Her only solace was that next time, she would bring a large enough force to grind the enemy warlock into dust.

Aftermath
From the very first turn, this was a slaughter. Since everyone did their jobs excellently, its hard to pick out an MVP, but the funniest moments are probably thanks to the Carnivean, who rolled boxcars, but only on frenzy checks or when attacking my own models! Between him and the Destroyer blowing off the Spriggan's shield, it seems our forces were telling us that "tactical" friendly fire was not a good idea.

Since my force did pretty well, I'd rather take a look at my opponent's army and consider what I would have done had the roles been reversed. First off, I probably would have deployed to the left, instead of on the right. The huge forest gave the Legion a huge advantage, since it shielded my troops while slowing his down. Even though we would be on opposite sides of the board, he had plenty of AOE's to whittle down my Strider while the rest of my force caught up. I probably would have put the Spriggan and Destoryer out front, blocking LOS to Kell and the Widowmakers. If the Striders moved up to try to get an angle shot, the Spriggan's flares would have made them easy pickings for my ranged units. Once the heavies reached me, I would probably placed the small models in front of my jacks and used my feat. Without the extra range from a charge, they would have a hard time getting to my jacks, but I would still be able to countercharge the next turn. With 7 focus to power the 3 jacks, taking out the Carnivean and Scythean would be easy, and essentially win the game since without them, Saeryn needs to cut for Fury. The main problems would be getting around her feat and respawn, but if I could draw out the feat with the threat of a charge and use the Manhunter to get the final hit after respawn, Khador would have a pretty good chance.

Monday, March 21, 2011

General Update and the start of the Month of Madness

Hey guys, sorry for the lack of updates - I got pretty swamped last week and didn't get a chance to get much Warmachine time in. I thought I'd take this time to let you know how my army is progressing.

Currently on the painting block are my Ogrun Warspears. I've been putting them off for a while now, mainly because the last time I painted a unit, it was exhausting. I've managed to get the first few colors on them, but my attempts to get them finished in a week failed miserably. I've decided that I'm going to let them sit for now and work on some other projects. I'll get a picture of them in the unfinished state later today.

The second big project I'm working on is my Scythean. I'm running into a major problem with him - the arms are too heavy for the glue to hold, causing them to fall off. I've asked some friends from the LGS to help me pin them, but for now, he's running around the battlefield armless. If I do manage to get the pinning going, I'll try to get some pictures so you guys can follow along! Oddly, being armless makes him much easier to play with since the arms don't get in the way of people getting in base-to-base with him.

Last but not least, there's another tournament coming up next month. Its at Games and Gizmos, one of the stores I used to frequent, but haven't been to in a while. This time, we're playing 2 35-point lists. I'm probably going to bring the following:

Epic Thagrosh
-Carnivean
-8 Shredders
Striders + UA
2 Spell Martyrs

Saeryn
-Carnivean
-Scythean
-2 Shredders
Striders + UA
The Blackfrost Shard
2 Spell Martyrs

These are the two lists I feel most comfortable playing, particularly since both Warlocks have 7 fury, which both lets me measure a larger area and gives me more flexibility with my beasts.

There is one catch about these lists - they aren't fully painted yet. I've decided I'm going to try to get them completed in the course of the month leading up to the tournament, in what I'm calling the Month of Madness. There are several steps in the process, and I'm going to list them out here. I'll add a new post once a week so you guys can follow along with my progress!

-Strip badly painted Shredders and Spell Martyrs (IN PROGRESS)
-Pin Scythean arms
-Prime Shredders, Scythean, Spell Martyrs, Blackfrost Shard
-Paint Shredders
-Paint Blackfrost Shard
-Paint Scythean
-Paint Spell Martyrs
-Base army

Its going to be a huge effort, and I don't know how much will get done, but with any luck, by the end of this month I'll have two fully painted and based lists!

Sunday, March 13, 2011

First Tournament

Yesterday one of the stores I play at was hosting a Highlander 15-point tournament, and it seemed like a fun opportunity to meet some other players. For those who don't know, Highlander follows the "there can be only one" rule - in this case, that mean one Warcaster/Warlock, one Warjack/Warbeast, one Unit with one attachment, and one Solo. Though Hordes factions are a bit weak in Highlander due to lack of beasts, I still wanted to play, and decided on the following list:

pLylyth
-Carnivean
Striders + UA
Spell Martyr

There were several things I was concerned about that would really make the format tough - the Winter Guard Deathstar (full Winterguard + UA + Iron Flesh + Kovnik Joe = 12 DEF 17 infantry with tough), Blackbane's Raiders (incorporeal in a format without much anti-magic), and Prime Goreshade's feat (adding a full unit of Bane Thralls in a format where everyone is strapped for points). I figured pLylyth would help deal with most of these threats, using her feat to hit high-def infantry and Eruption of Spines arced through the Spell Martyr to bring down mobs of infantry, even incorporeal ones. The Carnivean and Striders are my standbys, able to take on pretty much anything thrown at them. I playtested the list against a Sorscha/Juggernaut/Winterguard list, as well as a Stryker/Firefly/Long Gunners/pEiryss list, and won both pretty handily, so I felt decent about my chances, despite playing Hordes.

First round, I was up against Drake McBain, a Mule, the Nyss Hunters, and Epic Eiryss. I got the first turn and ran up, which he responded to by advancing up and using his feat to make the Nyss unkillable. I lost the game next turn, since I decided to use my feat to try to knock all the Nyss down, and even though I succeeded, it had very little impact on the game. Afterwards he shot my Striders to pieces and kept my Carnivean out of range with the Mule, whittling me down. If I had saved my feat and just retreated, I could have swept the Nyss Hunters later and then had a clear shot at the Mule with my Carnivean. Other highlights involved me forgetting to rile the Carnivean and having to cut for 6. Overall, I played terribly, but at least I'm learning.

Next round was against Epic Asphyxious, a Seether, Bane Thralls, and Bane Lord Tartarus. It started off fairly well - once again I ran forward, and when my opponent moves up in response, I shot his forces up. My mistake was overextending and charging my Carnivean forward so his assault spray could kill a few more bane thralls. Though the Seether couldn't get do him, my opponent then used Asphyxious' feat, and though the incorporeal models couldn't get to Lylyth, enough got to the Carnivean to finish him off. Though my opponent was down to just his Warcaster after my next turn, he camped focus to sit at armor 23, and I couldn't crack it, especially since I was cutting for fury.

Final round was against Reznik, the Fire of Salvation, Exemplar Errants, and a Vassal of Menoth. This time, I'm proud to say I did everything well - I used feat turn to take apart his Exemplars, then reformed them to block the path from the Fire of Salvation to my Carnivean. Unfortunately, luck wasn't on my side - my opponent's last 4 errants all made 8+ rolls to hit on 2 dice, killing just enough models for the Fire of Salvation to charge my Carnivean. Though he didn't kill it and I retaliated by taking the jack apart, Reznik was able to Hexblast my beast into oblivion next turn before retreating into cover. I failed to kill him that turn, and once again he camped focus to sit at armor 23, well beyond my reach.

Even though I went 0-3, I really had fun at the tournament! In hindsight, I prepared for all kinds of tricks, but not something as simple as a Warcaster camping focus. If I tried this again, I think I would bring Rhyas instead - though she has fewer answers to tricks, at least she can kill someone in a straight-up fight. The other option would be Epic Thagrosh, since not only does he hit hard, but with his Athanc isn't as hurt by the fact that I can only run 4 fury worth of beasts. The main problem would be he prefers several beasts in his battlegroup, but it seems like something worth trying out.

The same store is having another tournament in a month, this time at 25 points. I'll be gunning for my first win there!

Tuesday, March 8, 2011

Battle Report: Saeryn vs. Prime Sorscha

Hey guys, another battle report, this time bringing Saeryn agains Prime Sorscha. This was a Shattered Grounds game, so my opponent was bringing the special Kayazy underboss. Since I didn’t really know what he did, I went with what is quickly becoming my take-all-comers list:

Saeryn
-Carnivean
-Scythean
-2 Shredders
Striders + UA
Blackfrost Shard
2 Spell Martyrs

The Blackfrost Shard is a new addition, taking the place of the Nephilim Soldier, who never seems to do as much as I’d like. We’ll see if the blighted brothers can perform better.

Prime Sorscha
-Destroyer
-Spriggan
Great Bears
Full Kayazy + UA (Special league UA)
Widowmakers
Koldun Lord

I’m a bit worried about his Kayazy, but at least they don’t have the minifeat. I’ve also never gone up against a Spriggan, so I’m wary of that.

Terrain
So last time, I said I'd try to take pictures, but completely forgot. So I thought instead I'd put together a diagram of the map in the greatest of all picture editing softwares: Paint.


Wow, that's much easier and clearer than trying to explain it. I think I'll do this if I forget pictures again!

Khador Setup
Sorscha, the Koldun Lord and the jacks set up in the middle-left, the Kayazy go on the far left, and the Great Bears deploy on the right.

Legion Setup
I decide I want to take advantage of the forest, so I deploy my whole force on the right side. This also means his Kayazy will have a long way to go to get to me. I go with my standard beasts-in-front setup, forming a line with the heavies in the middle and the Shredders on either side. Saeryn and the Spell Martyrs set up behind them, and the Blackfrost Shard sets up on the far right, hoping to come in after battle has been engaged.

Khador AD
Widowmakers deploy forward on the right, near the obstacle in front of the Great Bears.

Legion AD
Since the Widowmakers have neither have nor can see Stealth, I decide they’re a good target for my Striders, so I set them up as far forward as I can on the right, across from the Widowmakers.

Khador 1
Afraid of the Striders, the Widowmakers run back behind the wall in front of my opponent’s deployment zone. Koldun moves up behind the wall as well and gives Destroyer 1 focus. The jacks run diagonal-right, trying to get close enough to the action to protect the squisier parts of the army. The Great Bears run up behind obstacle in front of them, staying in base-to-base for the armor bonus. Kayazy run forward-right, as my opponent has also realized it will take them some time to get into the action. Realizing he has more coins than he will probably be able to use, the underboss gives them tough. Lastly, Sorscha moves up behind jacks and casts Fog of War.

Legion 1
The heavies move up behind forest, and the Carnivean gives himself Spiny Growth, while the Scythean riles for 2. Striders move up, and deciding they don’t have a good enough shot at the bears, do 1 large CRA on the Spriggan for 4, then scatter with their reform move. The Shredders walk around the forest and the one to the left gives himself tenacity, while the Spell Martyrs follow them, staying back to avoid getting sniped. Saeryn moves up and put spiny growth on the Scythean and Respawn on the Carnivean. The Blackfrost Shard decide they’ll probably be safe without stealth this turn and opt to run forward.

Khador 2
The Kayazy run forward, three engaging the leftmost strider, and two more engaging two more Striders who reformed too close to them. Once more the UA buys tough. Spriggan moves up and uses his flares to make 2 Striders on the right visible, allowing the Widowmakers to move up and shoot at them. Luckily, DEF 15 prevails and they all miss. The Koldun Lord moves up and gives Destoryer focus, and he uses it to step up and boost the hit on his shot at the revealed Striders. This time they aren’t so lucky, and both are caught in the blast and killed. Great Bears run back and left, staying behind the Widowmakers in case they need to counter-charge. At this point my opponent’s jacks have formed a nice wall with the obstacle on the right, so Sorscha Wind Rushes up behind them for the DEF bonus and upkeeps Fog of War.

Legion 2
There’s a small space between the Spriggan and the obstacle through which I can see Sorscha, and I take a minute to debate trying to use the Blackfrost Shard and Striders for an assassination. I decide I can’t get enough models line of sight, so instead the left Shredder goes rabid and runs around the Kayazy, followed by a Spell Martyr. Saeryn then arcs Blightbringer onto 6 Kayazy, including the UA. 3 are tough, but the UA dies. While the assassins will still have tough for this round, at least one of the Striders is no longer engaged. They step back and through 1 is killed by a free strike, they take out 2 Kayazy in return in spite of tough. Carnivean and Scythean move up a bit, Carnivean giving Saeryn Spiny Growth. The Blackfrost Shard moves up, getting stealth, putting Kiss of Lyliss on the Spriggan, and taking an Ice Bolt shot to do 3 more damage. The other Shredder moves up behind them and gives himself Tenacity, while the remaining Spell Martyr moves up and right, near the edge of the board.

Khador 3
The Spriggan moves up and tries to shoot the Striders with his blast, poor deviation keeps him from hitting. Sorscha then moves up and casts Twister on the Scythean catching the Carnivean, and Saeryn as well. This is bad - I didn’t realize Sorscha had a knockdown spell. The Scythean and Saeryn each take 1, and all 3 are knocked down. Sorscha then activates her feat, freezing most of the Striders, Scythean, and Saeryn. While the Blackfrost Shard are in range, they’re immune to frost, and one is close enough to Sorcha to block line of sight to the Spell Martyr. She shoots Saeryn for 5. Widowmakers move up but cant get LOS to Saeryn, but gleefully go after the Striders that have been tormenting them, killing 2, including the commander. One takes a shot and the spell martyr but is barely short. The Kayazy charge and finish off the 3 Striders on the left, and one manages to engage Rhyliss (the BFS member with Kiss of Lyliss), but misses his attack. The Koldun moves up and gives Destroyer 1 focus, who shoots Saeryn and boosts the damage. The 12 damage would kill her, but I transfer to the shredder who I Blightbringer’d, dropping him to 1. Great Bears run up, forming a line in front of the Windowmakers in preparation for the counter attack.

Legion 3
Wow, brutal turn - not only are my Striders all but gone, my Warlock and heavies are all knocked down and/or frozen. There is one bright side - to get so much of my army in range, Sorscha has left herself pretty exposed. The bad part: there’s only enough space for one heavy beast, who’ll have to trample through some infantry to get there. And the worst part: there’s a frozen Strider nearby who may end up blocking me. I’m not great at gauging distances, and if there isn’t space for a large base then the assassination attempt will turn into my death sentance. I think for a second, then decide its now or never. Saeryn shakes freeze, Carnivean shakes knockdown, and Scythean shakes both. Spell Martyr weaves between the Striders and Shard, and Saeryn stands before using it to arc Breath Stealer onto Sorscha, boosting to hit. She then activates her feat - its the one shot I have of surviving if this fails, and will keep me from losing critical branches to free strikes. She ends her turn with 3 fury, and the Blackfrost Shard activates. Though Rhyliss is engaged, he can move enough to get line of sight and Ice Bolt the Strider that could block my trample path. Meanwhile his brothers both put Ice Cage on Sorscha, hitting thanks to Breathstealer and dropping her DEF to 10. The Carnivean then charges Bears, lining up the assault to hit Scorscha and doding the free strike from the kayazy thanks to feat. I boost the hit and damage rolls on Sorscha to drop her to 6 hp, then tear apart the one Bear in range. With everything set up, the Scythean tramples Rhyliss and the Kayazy, to get into range of Sorscha. He buys an attack with his last point of fury, and thanks to Breathstealer, the Ice Cages, and his own awesome power, squishes the enemy Warcaster.

Aftermath
I’m so relieved the assassination at the end worked out. I was doing well for most of the game, thinning out his infantry with the Striders and Blightbringer, but her feat hit pretty hard. The Blackfrost Shard really were the MVPs this game, avoiding the feat, taking out the blocking Strider, and helping bring Sorscha defense down to a point where the Scythean could hit without boosting. While I love the Nephilim Soldier model, he’s never worked as well as these guys did, so it looks like they’re going to be staying in this list!

Friday, March 4, 2011

Warchief Painted

In my effort to get as much of my army painted as possible, I've finished my Ogrun Warchief:


Like the twins, this guy has a lot of metal armor, but the skin (as well as the front arc) help add some lighter colors. The skulls help as well!

This model is particularly special to me since I was a Christmas present from my mom. I'm really happy that he's finally done!